How to Build a Horseshoe Pit
Horseshoe Court Quick Facts
- The distance between the horseshoe stakes is 40ft measured end to end at the bottom of the exposed stake.
- Horseshoe stakes are 1 inch in diameter made from C.R.S. (cold rolled steel)
- The height of the horseshoe stakes is 15 inches high. (above ground)
- Horseshoe stakes lean in towards each other about 2" per stake or at a 78 degree angle.
- Foul lines are 37ft for men or 27ft for women, children and elders translated this means if you are a man you can step 3ft in front of the stake and be a legal pitch. For the 27ft foul line it will have to be measured and marked.
Getting Started
So it's a new season the suns out and you have decided to put in some new horseshoe courts. Here are a few tips & pictures from a set of horseshoe courts I put in a few years ago.
The first thing you need to do is chose a location. Keep in mind you need about 48ft of flat ground, try to avoid areas which flood during the wet weather. Keep in mind the suns location during the evening hours when you will most likely be pitching, locate it away from trees which might interfere with the flight of the horseshoe. If you live in a windy location try to locate the courts in an area which may be more sheltered from the wind. And lastly try to keep in mind horseshoe courts can become a trip hazard at night so locating them along the sides or back of property lines is a good idea.
The horseshoe court I will be installing is going to utilize a railroad tie as the post base. This design has long been the standard method used by most top horseshoe pitchers. Some people have been using the 5 gallon cement bucket method but using them greatly reduces the life of your horseshoes along with causing many ringers to bounce off because they are too rigid to help absorb the shock of the horseshoe hitting it.
Materials
The materials I will be using is two 30" stakes, one 8 ft railroad tie, four 2" by 8" by 8ft pressure treated, two mounting plates, eight 3/8 lag screws, bunch of 3'' wood screws, four post mounts, The stakes and plates are available on our website, while the railroad tie, post mounts and wood can be purchased at your local lumber supplier.
Equipment
The equipment used was skill saw, 15/16 drill, drill, hammer, level, 50ft tape measure, large hammer (sledge).
Installation
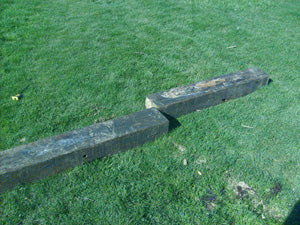
First thing I did was make make up my post assemblies. I cut the railroad tie in half. Chainsaw works great but this can also be done with a skill saw. Wow does this stuff smoke when cut.
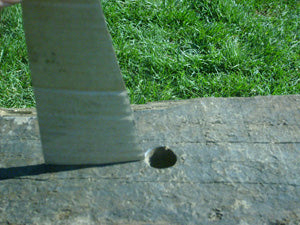
I made a cardboard cut-out of the proper angle the stake should lean forward at 12 deg. Then used it to help set my drill at the proper angle. I drilled it about 7 inches deep as trying not to go all the way through. The railroad tie measured 6" by 8" More on that later. TIP Before drilling the hole make sure there are no major cracks or rotten out areas where you will be drilling the post hole. I must confess I did not have a 15/16" drill so I used a 7/8" and worked the hole out to size. The danger is if you do not work it out enough you could crack the tie when pounding in the horseshoe stake.
In this picture I used my cardboard cutout to set the angle of the stake before driving it into the block. I also marked the stake at 7 inches the same depth as the hole I drilled. I pounded the stake into the block until I felt some resistance. Tip#1 It is best when you get close to the line to check the underside of the tie to make sure the block is not bulging, that would mean you went too far. If you did go too far no big deal just tap the bottom flat again and carry on. I will address the solution to drilling too far or all the way through latter on. Tip#2 Use a board or something similar between the top of the post and sledge hammer to avoid mushroomming the top of the stake from the pounding.
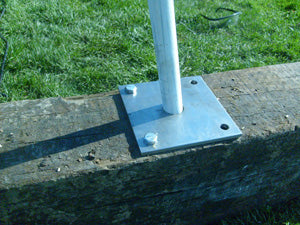
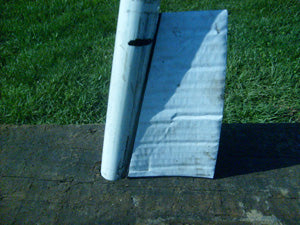
Once the stake is in place slide the retainer plate over the top. Drill the proper pilot hole size for the lag screws then bolt down the plate in 4 places. The purpose of the plate is to stop the hole in the railroad tie from becoming enlarged from the constant pounding of all those ringers. We are running a special on stakes and plates . Check out our specials page for more info.
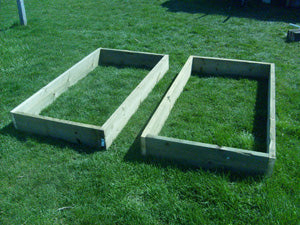
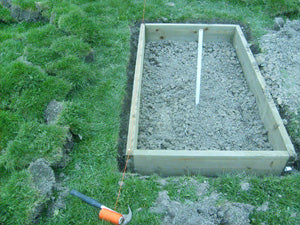
I have the stake assemblies made now time to make the boxes. My goal was to make the boxes to have an outside finish dimension of 3 ft by 5 ft 3 inches. So I cut off 33" off each 2 by 8. (the 33" pieces become the front and backs of the box) I screwed all the boxes together. I chose this size of pit because I was planning to use clay in my courts. You can go longer 6ft if you wish, but the longer it is the more material you have to fill it with.
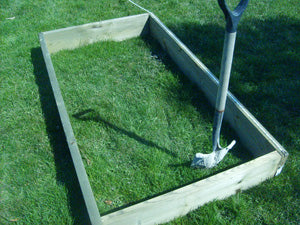
I rough positioned the frames measuring from the back of the frames 44 1/2ft. (2ft 3" behind each stake) I used the tape measure to also align them straight to each other by running it down one side.
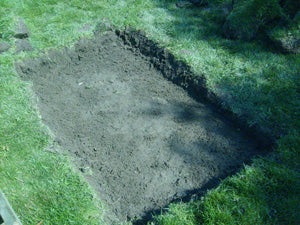
I dug out both pit areas about 5 -6 inches deep. The nice thing about spring installations the topsoil separates easily. I keep the grass to one side to fill in some low spots around my yard. Tip: Don't be shy on the dig out make sure it is big enough to only have to set the frame in a few times.
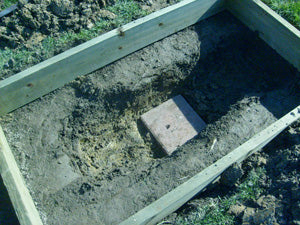
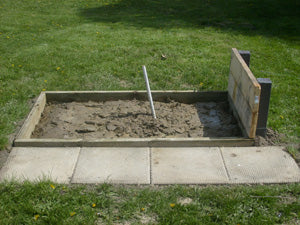
Now I have set my frame in made sure it was level in all directions. I also dug out my second level for the railroad tie. The depth will be approx. deep enough for the top of the tie to sit flush with your first level of pit dig out. As you can see at the bottom of this cutout I put a 1' by 1' patio stone. A few pictures ago I mentioned if you went too far with your drilled hole I would tell you how to fix it. The patio stone right underneath the stake will stop the horseshoe stake from dropping on you in the future ( a common problem in horseshoe pits).
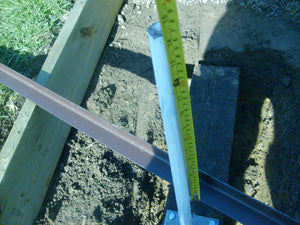
With the stake assembly in place I verify the height of the stake at 14-15 inches is the target number. I used an old bed frame laid across the court box to get the proper dimension. Any long straight item will work.

I have positioned the stake assembly, measured the stake from the front of the court to the front of the stake at 36" From side to side at 18" I made sure by using a level the tie was sitting flat. This will ensure the proper lean, And by using the level on the side of the stake made sure it was not leaning side to side. Now I packed in dirt around the stake assembly packing it in quite often as I went. Tip Keep checking the level and tape measure to make sure you did not move the stake when packing it in.
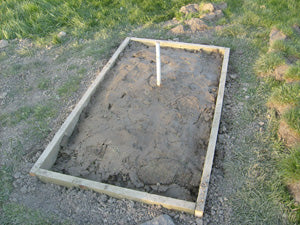
Now it is time to do the final alignment on the box. You have the stakes set 40 ft apart. you have each box 36 inches in front of the stake. Now you want to make sure they are in line with each other. Put a nail in the back corner of each pit (same side) Now tie a string to one nail then pull it tight to the other nail. Use this straight line to tap you frames at the front until the string goes right down the middle of the outside boards. Now you have them in line go ahead and fill in around the outside of the frame and fill in the inside area until you are about 6 inches from the top.

The box has been lined up and ready for pit material. Before I added any I cut out a piece of plywood and laid it on the bottom of the pit. I then added a piece of plastic. The plywood bottom is to act as a divider between the pit material and the regular ground. The plastic is designed to help hold in the water. Since I am putting in clay pits and clay needs water to stay soft the plastic will help keep it moist. If you are using sand as the pit material don't use plastic but the plywood bottom is a good idea.
Now time to fill in the box with your pit material. This is one of my pits filled with clay. On my clay pits I generally keep the middle high at the proper height and keep the sides and front lower. As the clay gets pounded down it works towards the outside and back and you just keep moving it back to the middle. The other advantage is if it rains the water won't lay in the middle. Clay that gets too wet is unplayable. Now all I have to do is put in my walkways and backboards and I am done. More to come.

This is a pair of my back board support post. I reclaimed the post from my old court. These are your standard 4" by 4" deck spike post available from your local building center. These are quite long so be careful when installing them to make sure no hidden cables or such are buried near the location point. Since the 4 by 4 was already installed when I pounded them in I used a piece of wood between the top and my sledge hammer as to not damage it too much.
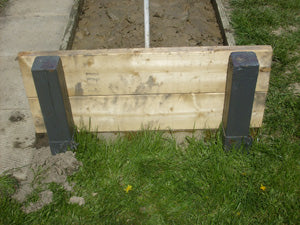
After I have my post pounded in I cut off a pair of 2 by 8's at 36" long then screwed them to the support post. I cut off a few extra backboard blanks to be used at a latter date once these get beat up and trust me they will be in splinters by the end of the season if not sooner depending on how many horseshoes ping off the top of the stake.
Once the back board is in place you need to install a pitching platform. Over the years I have seen all kinds of stuff used for this, from perfectly poured concrete, wood slabbed boards , crushed stone to even buried railroad ties. All it needs to be is flat and firm. For me I have always used patio stones. I find that if they move around you can always relevel & reposition them. I have seen some solid concrete that over the years has become twisted, heaved and cracked and of course hard to fix and pitch on. The patio stones I used are 18" square 4 per side. As you can see I still need to add some for the opposite side. You might notice the frame is slightly higher than the pitching platform. I did this for my installation because a number of the larger tournaments are pitched indoors on raised courts so I wanted to simulate pitching on raised courts. If your frame does end up sticking out of the ground I suggest pilling up dirt in front of the front board to help eliminate the chance of getting hit with a direct blow from a short pitched horseshoe. The first horseshoe pits I made my front board got hit quite often.
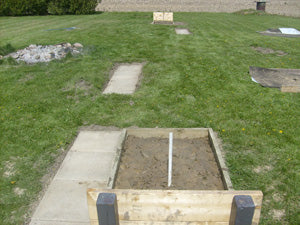
Here is a snap shot of the almost finished product. I have pitching platforms for both the 40 and 30 foot pitchers one side only. I still need to finish the other side at some point. But since I only pitch from the left side. (most right-handed pitchers pitch from the left side of the pit. That way their pitching arm is more in line with the stake. At some point I will paint my back boards a dark color and make some box covers to keep the sun from drying out my clay and keep it from getting rained on.